2022-05-24
Handholes bury underground just deep enough so that their lid is flush with the surface of the ground, which people can reach its bottom by their hand, for the purpose to install or maintain telecom equipment such as fiber enclosures, cable splitters
The following 4 steps walk through the main points of a typical field installation of a handhole that is smaller than 24 in x 36 in X24 in. It is important to comply with federal, state, and local laws and any applicable building codes to ensure a successful installation.
Four Basic Steps to install a Handhole
Site Selection – Select an enclosure that is appropriately rated for the site by following the ANSI/SCTE tier rating system for enclosures. Excavate a hole, lift the box and cover into place separately, and backfill to complete the installation. A successful install begins at the storage yard. Properly handling and transporting an enclosure to the job site will ensure that the enclosure is not damaged and the finished product performs as intended. Please call 811 to locate any buried utilities before digging. And check the Special Specification 6240 of Texas.
Excavation – After carefully unloading the enclosure on-site, survey and secure the job site, hold a safety briefing, and note the slope of the ground. During excavation, dig the hole six inches to one foot larger than the enclosure on all sides. Excavate deep enough to accommodate six to eight inches of crushed rock and level the enclosure. After measuring the depth of the hole, excavate six to eight inches deeper to provide room for the crushed rock. Move the enclosure and the cover to the site in a manner that minimizes any damage to the enclosure. Regularly check the depth of the hole about the grade of the surrounding area. Prepare conduit runs to understand how all components will fit into the box. Measure the conduit to determine cuts before placing the enclosure.
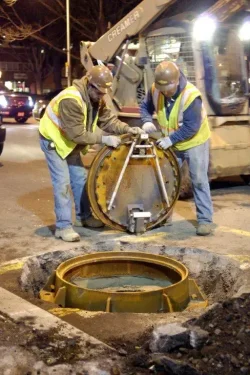
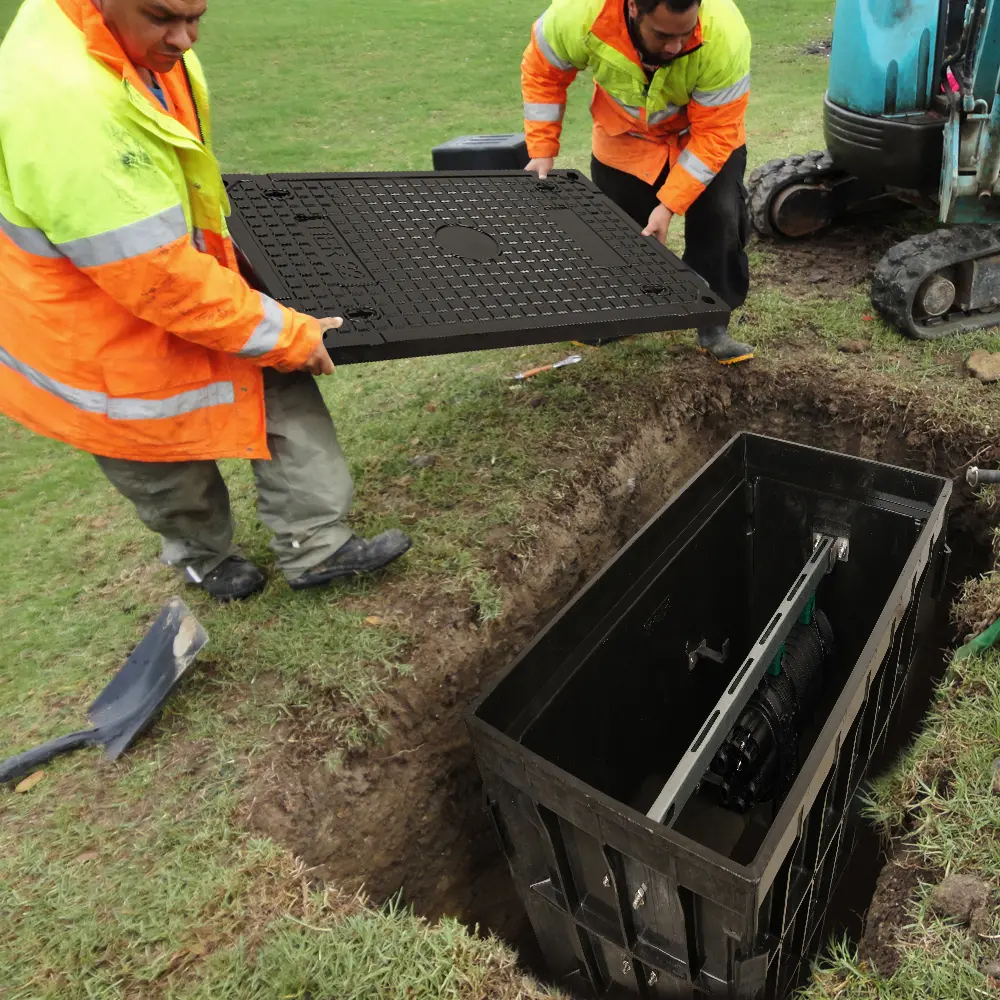
Placement – Remove the cover from the enclosure before lifting the box. Move and position the box into place. Add gravel and cut side walls as needed. Position the small enclosure and note any incoming conduit paths. If additional crushed rock is needed, rather than removing the box, you can add rock and lift the enclosure. This process might need to be repeated several times until the box is level. Clear any rocks from the lip of the enclosure and remove any bolts before installing the cover. If the box needs to be cut to accommodate existing conduit paths, use a diamond-tipped masonry hole saw or a cut-off grinder. When cutting, do not cut the corners of the enclosure and do not remove more than 25% of any sidewall. When removing a cut piece, use gloves to avoid getting fiberglass shards embedded in your hands. Knockouts and terminators can be pre-installed at the factory to save time in the field.
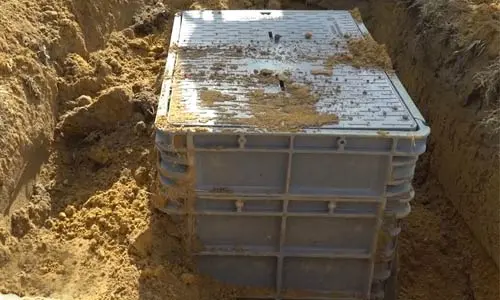
Backfill – For good soil compaction, tamp the dirt every time 6" of backfill is added. On composite boxes, work the backfill soil in between the sidewall structural voids before tamping the soil around the box. Backfill to grade.
Carefully install the cover and do not drop it. Rough handling of covers during installation can cause the lip of the box to chip and can damage the cover. Ensure proper soil compaction so that surrounding soil does not sink over time. Crews can temporarily mark their completed enclosures with conduit stubs so they could quickly audit their finished job site.
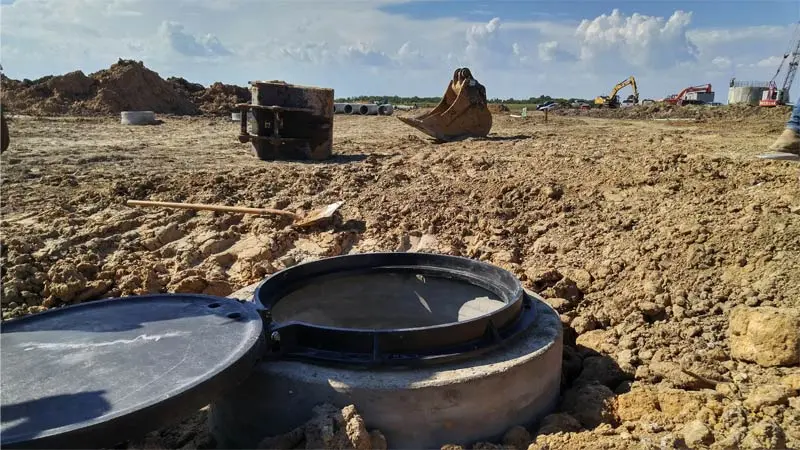
Site plans might specify that a concrete collar is to be poured around the enclosure for cosmetic reasons, for extra security, or for additional strength. Begin by creating a form and adding gravel to the base. A cutaway view shows the layers below the concrete ring of an enclosure. The concrete apron should be a minimum of four inches thick but can fill the space between the top lip of the enclosure and the gravel base.
Jinmeng supplies underground handholes for applications in telecommunications. We carry an array of underground handhole sizes and specifications made from sheet molding composite. We also supply manhole covers that meet ANSI_SCTE 77 2013 standard and can pass txdot.gov standard
Manhole Information
A manhole is a huge structure.
One of the major components of the storm sewer drainage system and the sanitary sewer collection system are manholes. From the surface, manholes appear to be just a round metal disk (about the same diameter as a car tire), with the words “Storm Sewer” or “Sanitary Sewer” stamped on the top. But, below the surface, the subsurface structure is typically about 5 feet in diameter and can be up to 20 feet deep in the ground. The manhole and subsurface infrastructure weigh several thousand pounds and are typically installed with a large piece of construction equipment to connect them with pipes used to transport rainwater or wastewater. They are massive structures and do not move without significant external force. Below is a picture of a typical manhole installation.
Manholes are installed prior to any sidewalks, driveways, or other structures.
When a developer establishes a neighborhood, one of the first steps is the installation of utilities, including the water, drainage, and sanitary sewer systems. This installation includes manholes. After utilities, streets are typically constructed. Once utilities and streets are completed, the neighborhood then has vacant lots waiting for homes to be built.
The homebuilders then purchase the vacant lots from the developer and choose how to position the homes on the lot, as well as choosing the location of the driveway. The homebuilders then build the house, driveway, sidewalks, etc. Sometimes the homebuilder locates sidewalks or driveways on top of the existing manholes and other District facilities.
The manhole rarely cause sidewalks to crack or move.
As stated, manholes are massive structures that are connected to significant pipe structures. They do not move except in rare circumstances. However, sidewalks and driveways are typically only about 4 inches thick with some steel reinforcement and are built to lay on top of flat ground. Concrete is rigid and does not bend as the ground moves. The two most common forces that move the ground, and thereby impact sidewalks or driveways, are tree roots and water flow. Tree roots tend to attempt to lift a sidewalk, which causes cracking. Water flow from either sprinkler system leaks or water drainage from gutters tends to erode the ground below the concrete, creating a sunken section. In some cases, both forces are working in the same area.
There are options for a damaged sidewalk or driveway.
If your sidewalk or driveway is damaged, look first for water leaks, water flow or tree root infiltration. Until those problems are addressed, it won’t be effective to repair the concrete. After that investigation is completed, if the concrete is solid, it is generally less expensive to inject a slurry mixture to lift or level the driveway or sidewalk. The concrete can be re-poured, but that is generally the most expensive option.
How to Install a Manhole
The installation manhole can be broken down into several stages
Excavating the Site and Pouring the Slab
The area where the manhole is going to be installed should be excavated large enough to accommodate the manhole and to provide a safe working environment for the installation personnel. Always follow federal, state, and local construction codes and apply industry best practices when it comes to open pit construction. Saving time here can have deadly consequences!
With the site excavated, a concrete foundation slab must be installed for the manhole to sit on. The slab can be field poured in the excavation or poured off-site and then lowered into the manhole. If line downtime is a concern (usually for industries and jails/prisons), it may be more economical to pour the slab off-site and then move it into position when needed.
Concrete foundation slab for Manhole
The concrete slab should be level from side to side and from front to back and must have a smooth, troweled surface. There should be no debris or exposed aggregate.
Setting the Manhole
With the site excavated and the slab poured, it is now time to set the manhole in place. Making sure the slab is free of debris and exposed aggregate, the manhole is lowered into position. A foam pad is provided with the manhole onto which the manhole will rest. When mounting legs are present on the integrated structure, foam spacers are provided for them as well.The use of the pad(s) is optional but recommended. Occasionally the pad will need to be removed to allow shimming of the manhole to make it level. In general, though, the foam pad should be used whenever possible.

lowering a Manhole into the excavation
When moving a manhole, plan the move and use slow, smooth movements to avoid overturning. With the manhole set on the slab, it can now be secured into place. Wedge style (or similar) anchors are commonly used to secure the manhole. Preset (cast) anchor bolts are generally not recommended as they provide little leeway or flexibility if the position of the manhole needs to be adjusted.
Piping Connections
There are three styles of connections available for manholes:
Pipe stubs (with flexible couplings)
Flanges
Caulking collars
Pipe stubs with flexible couplings are the most common connection type. Here a pipe stub is laminated to the manhole or integrated structure to mate up to the line piping. A flexible coupling is provided with stainless steel clamps to seal the connection between the two pipes and make it watertight.
Alternatively, 150 lb. flat-faced flanges may be provided – either in one hole or two hole pattern – where a rigid connection is required or where the materials of construction available for the standard flexible coupling are not suitable for the process conditions.
Connecting Manhole to piping
On very rare occasions caulking collars may be provided. Caulking collars are oversized pipe stubs into which the line piping is slid. The annular space between the two pipes is then packed with a watertight compound or material (i.e. oakum). The primary use for caulking collars is where off-angle piping needs to connect to the structure. Note, though, that off-angle piping is not recommended for use with flow monitoring manholes.
Backfill
With the manhole set and secured, the excavation can now be backfilled. Starting under the piping connections and any portion of the structure extending outside of the manhole barrel,
backfilling Manhole excavation under the piping. Backfill should be clean and without construction debris or materials larger than 1-inch [2.54 cm] in size. Sand or pea gravel are the recommended backfill materials,
Rushing the backfill (i.e. backing up a dump truck and emptying the bed all at once) and using low quality fill materials (construction rubble) should be avoided at all costs.
The top part of the manhole should backfill with three components adhesive layer + steel support + asphalt layer if the manhole is set on traffic rated road.

The asphalt layer can be replaced by other material if the manhole is placed on an inner road or open plaza
Install Manhole Covers
Composite Manholes Cover are lightweight (~1/6 the weight of concrete), corrosion-resistant, and watertight. Their installation is straightforward and can be accomplished with less manpower and equipment than a traditional iron manhole cover. Jinmeng produces all size range of composites manhole covers that meet AASHTO M_306-10 standards
The America Fiber Optic Contractor Do List and Introduce of Telecom Handhole
The Beauty and Purpose of Hospital Manhole Covers Shows More Symbolic Strength